Some firearms are pieces of art that deserve to be protected.
Even the least expensive gun, though, is an effective tool and should be the subject of your care so it can serve you for a good long time.
I’ve traveled across the United States. Literally. I’ve hunted in Florida, Alaska, and several states in between.
Because I’ve had to deal with such wildly different environments, I’ve spent a lot of time trying out various protective products to keep my guns safe from sun, water, and brush.
The best solution I’ve found for wood and blued steel is gun wax. It’s easy to apply and offers excellent protection against rain, sweat, and whatever else life throws at your gun.
But waxing guns isn’t for everyone.
Why is wax different from oil? Who would benefit from waxing their gun? And how do you wax guns anyway?
All these questions and more are answered below!
Why You Should Wax Your Guns
Oil may be the go-to protectant for many people, but wax is often better.
That’s because a high-quality gun wax offers a strong level of long-lasting physical protection to metal and wood without the side effects you get with oil.
Oil, being liquid, tends to move. This is good for when you want to lubricate hard-to-reach areas. It’s bad if you want your gun’s protection to stay on the weapon.
If you set a hunting rifle in your gun safe with the barrel pointing up, then oil can seep into the buttstock and cause swelling, eventually cracking the wood.
Oil on pistols in a concealed carry holster is known to stain your clothes. It’ll also rub off the gun, compromising protection and allowing your sweat to rust the gun.
Wax, however, doesn’t seep. It stays right where it is.
It also protects wood without causing any swelling, making it perfect for traditional firearms.
In fact, wax protects against solvents capable of stripping the oil off your gun!
A good gun wax dries hard and is invisible on your gun.
Actually, scratch that. A good gun wax can make your gun’s finish a bit more beautiful.
And, because it dries hard, it’s a waterproof physical barrier, perfect for outdoor hunting days.
The following types of firearms benefit significantly from being waxed:
- Guns with a blued finish
- Collectible firearms
- Hunting guns
- Concealed carry pistols
- Guns in long-term storage
Just about the only firearms that don’t benefit from gun wax are the ones made of aluminum and with polymer stocks.
Your Glocks and ARs may not see much benefit from being waxed. I don’t wax my modern sporting rifles.
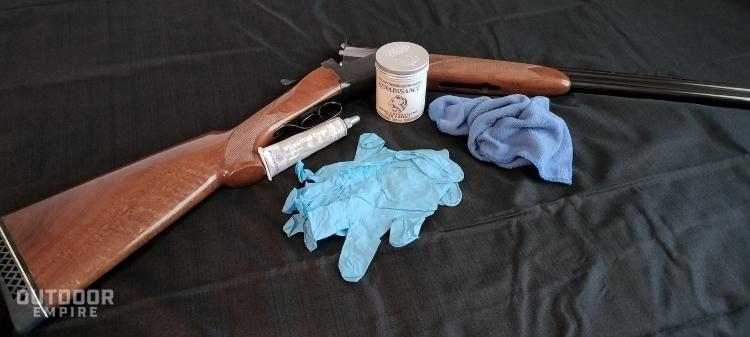
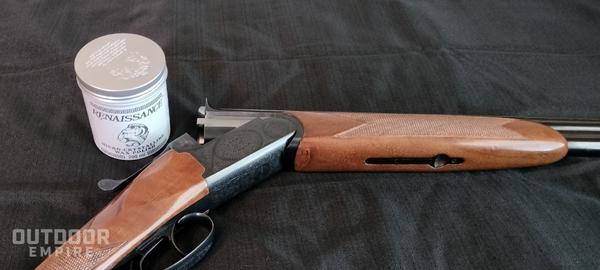
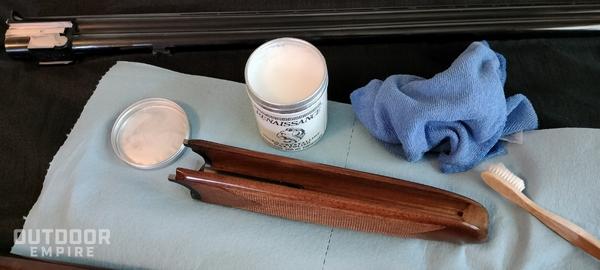
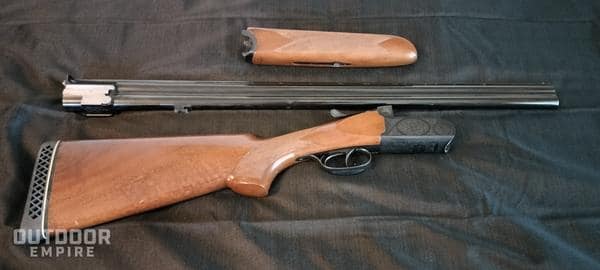
I wax my traditional firearms, though, such as the Antonio Zoli 20 gauge over/under upland hunting shotgun, shown in the photos on this post.
My skin oils tend to cause blued steel to rust, even if the gun has been well oiled.
Since I’ve started waxing my guns, though? No more rust!
Reasons to Avoid Waxing Guns
Not everyone should wax their entire gun collection, though.
You’ll want to stick to other protection methods in a few situations. Let’s look at those.
Perhaps the most important time to avoid waxing a gun is when you are in the process of refinishing its wood stock.
First, wax’s protective qualities make it a huge pain to remove. Seriously, I’d rather deal with cosmoline than try to remove wax!
Also, while wax is good at protecting most wood finishes, you only want to apply it to a dry finish.
If you wax up a gun stock that hasn’t fully dried, then neither will dry, and you’ll have a tacky piece of wood forever.
Also, don’t wax wood you plan on having checkered in the future. This is because the wax can gunk up checkering tools, making the process much more frustrating.
Finally, gun wax doesn’t do much for polymer surfaces.
I have heard that shoe wax (not gun wax!) can help protect your gun’s plastic pieces from UV damage and fills in tiny scratches, but I haven’t tried this myself yet.
Which Wax Should You Use?
The type of wax you use is essential.
You should never wax your firearm with car wax!
That’s because car waxes contain polishing compounds. That polish will wear away your gun’s nice finish.
Keep car wax away from guns, especially ones with blued steel.
Floor waxes and furniture waxes are good. They make the gun waterproof and protect against both rain and sweat.
Johnson’s Paste Wax is sometimes recommended because of this.
Dedicated gun waxes are the best, though.
Renaissance Wax is the gold standard of gun waxes. It’s a micro-crystalline wax designed to help museum pieces stay preserved forever without harming the artifact.
Firearm museums tend to use Renaissance Wax. It’s my preferred product, too.
It’s expensive, but even the small container will last you for years.
Another option is Flitz Rifle, Gun, & Knife Wax.
Raw waxes such as beeswax aren’t great choices but can waterproof your gun in a pinch.
Don’t even think of using earwax!
How to Apply Wax to Your Firearm
Now that you know why waxing your gun is such a good idea let’s learn how to use it to protect your gun from rain, sweat, dirt, and more.
What You Need to Wax Your Gun
At its simplest, the instructions for gun waxing boil down to applying wax to your gun and then buffing it off with a cloth.
It’s really that easy!
You’ll want to keep some details in mind while waxing your gun, so you get optimal protection, though. So I’ll cover the process in detail.
You need these three items to wax your gun:
- A good wax
- A soft cloth
- Nitrile gloves
- Your gun
I covered the best type of gun wax above.
As for the cloth, microfiber can work. However, I’ve found that microfiber is fine for buffing the wax but not for applying it in the first place.
Microfiber is just too good at holding onto the wax!
So, either use a non-microfiber cloth to apply the wax to the gun or spread it by hand. I tend to do the latter and wear nitrile gloves to keep my skin oils away from the gun’s blued finish.
The above list is good for maintenance waxes. However, you need a few more items before you wax your gun the first time:
- Tools for disassembly
- Toothbrush or nylon brush (preferred)
- Solvent and lubricant (optional)
This is because you want to apply wax to many of the interior portions of your gun and its parts the first time you protect your gun.
The brush is there to help apply the wax to crevices, small areas, checkering, and engravings.
And you may want some solvent and gun oil (or gun grease) handy. You’re disassembling the gun for this so go ahead and give it a deep clean and lube.
The Gun Waxing Process
Here are the following steps for waxing your beloved firearms:
- Clear the Gun
- Disassemble
- Clean
- Apply wax
- Buff wax
- Lubricate
- Reassemble
If you’re giving the gun a deep clean, then when you do so will depend on if this gun has been waxed before or not.
If this is your first time waxing this gun, then clean the gun before you wax but don’t lubricate it until after you’ve waxed it.
But if you’ve already applied wax at least once, wait until you’ve buffed off the new wax to clean.
This is because gun wax does a bit of cleaning itself. You may not need to deep clean the waxed areas.
However, gun wax is good at protecting against solvents, so you’ll have a heck of a time deep cleaning an area that’s already been waxed!
So, you want to apply wax to a clean surface if it’s your first time.
Let’s look at the steps.
1. Clearing the Gun
The first thing you should do is make sure your firearm is completely unloaded and safe to handle!
Remove the magazine, if any. Empty the chamber.
Then observe that there is no ammo in the gun. Use your eyes, then confirm what you see with a finger in the chamber.
Also, remove any ammo from your work area. We don’t want a stray round mysteriously hopping into the chamber!
Once you have 300% confirmed that your gun is empty, you can proceed with the waxing process.
300% isn’t hyperbole, mind you. Check, double check, then triple check!
2. Disassembly
How far you disassemble the guns depends on how much protection you want to add.
If this is your first time waxing the gun, disassemble it to the point where every piece of metal or rubber has been removed from the forend and buttstock.
You want to be able to coat all of the surfaces with a protective wax layer to protect against water seeping between the metal and the wood.
Once you’ve done this once, though, you won’t really have to disassemble this far for future gun cleanings.
If it’s been a while since you’ve waxed your gun, or you’re going to take it out for a hunting trip, then slightly disassemble the gun. Remove parts like the pistol grip, stock, and handguard, but don’t worry about removing the metal pieces, grip caps, butt plates, etc.
This will let you wax the more at-risk portions and doesn’t take much extra time.
For quick wax-downs, you don’t even need to disassemble your firearm. Just wax the outside!
3. Cleaning the Gun
Next, take your cloth and gently wipe over the entire surface of your firearm.
This quick pre-cleaning step removes dust and light amounts of gunk.
If this is your first time waxing your gun or it’s noticeably dirty, then give it a deep clean right now.
4. Applying the Wax
Now you want to put a little bit of wax on every surface of the gun that’s not a friction-bearing surface.
Avoid any part of the gun that has metal-to-metal contact. Pivots, bolts, action bars, etc., should all be lubricated, not waxed.
Wax is not a lubricant!
Put a small amount of wax on your cloth (or gloved fingers) and lightly smear it on your gun.
It’s better to use lots of small applications rather than globbing a bunch of wax on your gun at once.
I like to work in large sections when waxing my gun. With my shotgun, I’ll wax the inside of the forend, the outside of the forend, the barrels, the buttstock, the receiver, and the trigger area.
Renaissance Wax dries immediately so you can buff right after application. Read your wax’s instructions to see if you need to wait before buffing.
5. Buffing the Wax
Take your cloth and swipe repeatedly and with gentle pressure to buff the wax until you can’t see any wax remnants on your gun.
If you’re waxing over rust or a dirty portion of your gun, then make sure to use a different section of your rag frequently, so you don’t rub contaminates into your firearm’s finish.
A properly buffed surface should look clear and lustrous.
6. Lubrication
Now’s the time to apply your lubricant of choice to the friction-bearing and metal-on-metal surfaces you didn’t wax.
Every metal and wood part of your gun should have some sort of protectant, whether it’s wax, oil, grease, or a strong finish.
7. Reassembly
Once your gun is waxed and lubricated, it’s time to put it back together.
This is the most satisfying step because, once you’ve reassembled your gun, you’re left holding a beautiful tool.
Go ahead and admire it for a minute before proceeding with your day.
Conclusion
Gun wax is a great product that protects your gun’s finish without the risk of staining your clothes or cracking wood pieces.
It’s easy to apply. Just give your metal and wood a light wax coating, then buff it off with a lint-free cloth.
My favorite gun wax is Renaissance Wax, a micro-crystalline wax that prevents water ingress and protects against scratches and fingerprints. I use it to keep my wood-and-steel guns safe from nature and the ravages of time.
Have you waxed up any guns? Let me know in the comments below!
FAQs
Can You Protect Your Gun with Car Wax?
No! Car waxes contain abrasive compounds that can damage your gun’s finish.
Can You Use Floor Wax on Your Gun?
Some floor and furniture waxes can be used to waterproof and protect firearms, though Renaissance Wax or a dedicated gun wax is the superior choice.
Is Beeswax Good for Gun Stocks?
A mixture of beeswax, pine tar, and turpentine has been used historically to protect firearms from the elements.
This recipe is sometimes called FinnWax because Finnish soldiers supposedly used it to protect their Mosin Nagant rifles. However, it’ll stain and darken your stock.
Beeswax on its own is hard to apply and should only be used in an emergency.
How Long Does it Take for Gun Wax to Dry?
Different waxes have different drying times.
For example, Renaissance Wax dries instantly but Flitz Gun Wax takes some time to dry to a haze.
Can Gun Wax Remove Rust?
Gun wax has light cleaning properties and can remove light surface rust.
However, wax is not a good choice for removing pitting or serious rust.